Learn the Kubernetes Key Concepts in 10 Minutes
In this post I will provide a brief explanation of the key concepts of Kubernetes. I will avoid using lengthy definitions, these are already available in the Kubernetes documentations. Rather, I will be using a few diagrams (some animated) and examples to explain these concepts. I found a few of the concepts difficult to fully grasp without a diagram (Service for example). Where appropriate I will also provide links to the Kubernetes documentations if you want to deep dive.
Let’s start the clock.
What is Kubernetes?
Kubernetes (k8s) is an open source platform for automating container operations such as deployment, scheduling and scalability across a cluster of nodes. If you have ever used Docker container technology to deploy your containers, then think of Docker as a low level component used internally by Kubernetes to deploy containers. Not just Docker, but Kubernetes also supports Rocket, another container technology.
Kubernetes orchestrates your containers so together they are performing a Symphony. This could be anything from, but not limited to, the following:
- automate the deployment and replication of containers,
- scale in or out containers on the fly,
- organise containers in groups and provide load balancing between them,
- easily roll out new versions of application containers,
- provide container resilience, if a container dies it gets replaced, etc..
In fact, with Kubernetes you can deploy a full cluster of multi-tiered containers (frontend, backend, etc…) with a single configuration file and a single command:
$ kubectl create -f single-config-file.yaml
kubectl is a command-line program for interacting with the Kubernetes API. Now let’s introduce some of the key concepts.
Cluster
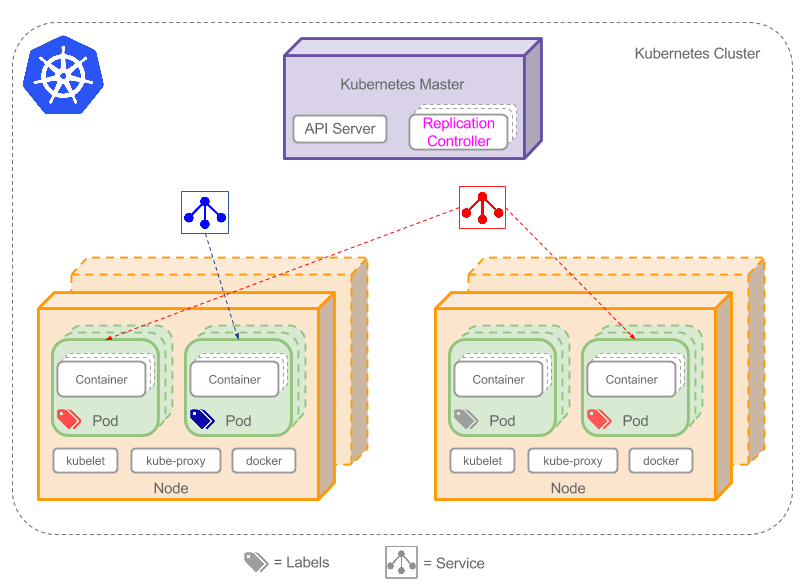
A cluster is a group of nodes, they can be physical servers or virtual machines that has the Kubernetes platform installed. The diagram below is an illustration of such cluster. Note this diagram is very simplified to highlight the key concepts. For a typical Kubernetes architecture diagram see here.

Looking at the diagram you can spot the following components, I used icons to represent Service & Label:
- Pods
- Containers
- Label(s) (label)
- Replication Controllers
- Service (service)
- Nodes
- Kubernetes Master
I will start off with Pods because they are the smallest deployable units in Kubernetes that can be created scheduled and managed. It’s all about the Pods, if you deploy a single container it will be deployed in its own Pod.
Pods
Pods (green boxes) are scheduled to Nodes and contain a group of co-located Containers and Volumes. Containers in the same Pod share the same network namespace and can communicate with each other using localhost. Pods are considered to be ephemeral rather than durable entities. You might be asking yourself a few questions:
If Pods are ephemeral how can I persist my container data across container restarts? Well, Kubernetes supports the concept of Volumes so you can use a Volume type that is persistent.
Do I create Pods manually, what if I want to create a few copies of the same container do I have to create each one individually? You can create individual Pods manually, but you can use a Replication Controller to rollout multiple copies using a Pod template, which will be explained below.
If Pods are ephemeral and their IP address might change if they get restarted how can I reliability reference my backend container from a frontend container? In this case you will use a Service as explained below.
Before I go on to explain Replication Controllers and Services, let me first introduce Labels.
Labels
As you can see from the diagram, some of the Pods have labels (label). A Label is a key/value pair attached to Pods and convey user-defined attributes. For example you might create a ‘tier’ and an ‘app’ tags to tag your containers by applying the Labels (tier=frontend, app=myapp) to your frontend Pods and Labels (tier=backend, app=myapp) to backend Pods. You can then use Selectors to select Pods with particular Labels and apply Services or Replication Controllers to them.
Replication Controllers
Do I create Pods manually, what if I want to create a few copies of the same Pod, do I have to create each one individually, can I group Pods into logical groups?
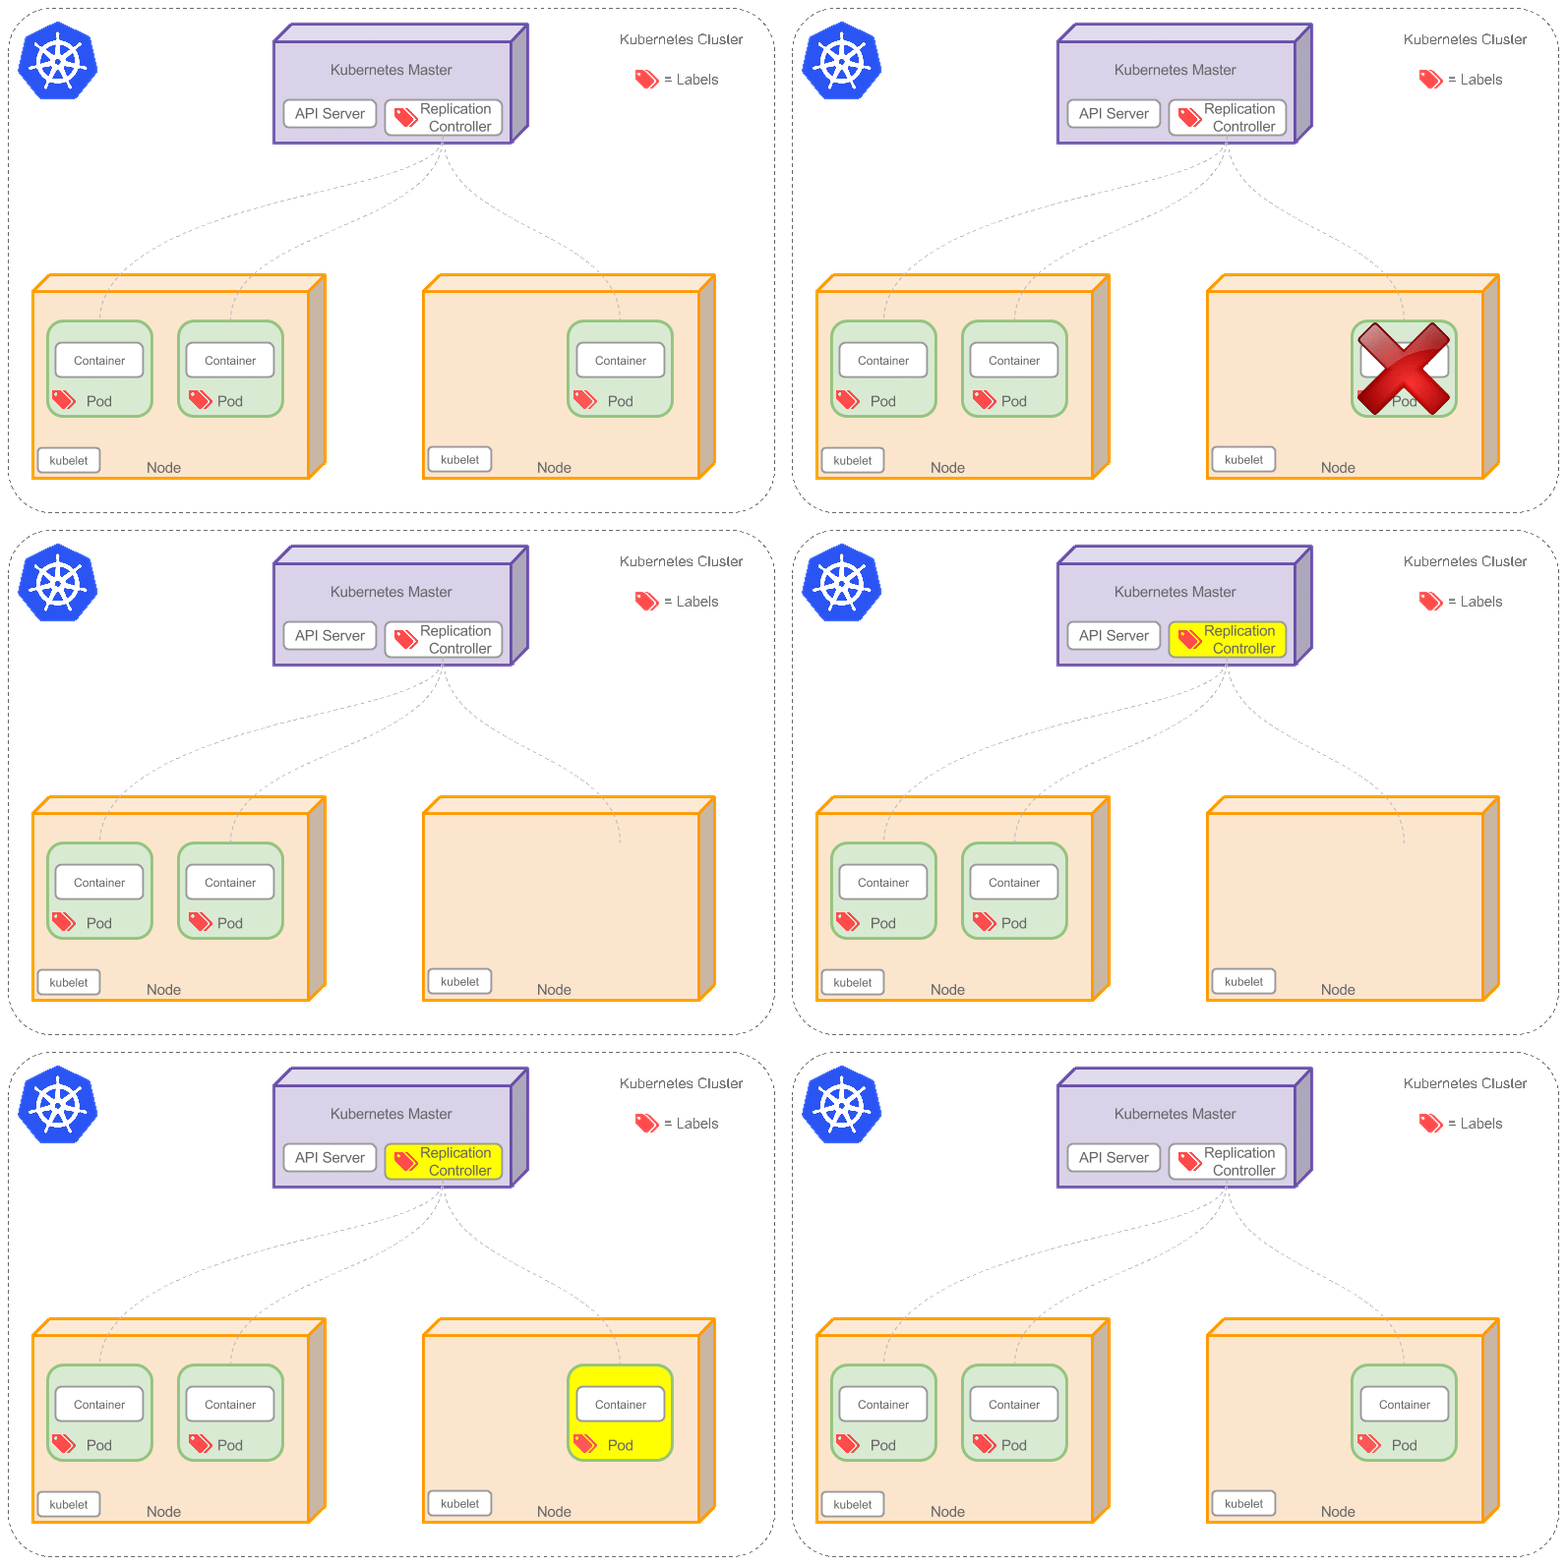
Replication Controllers ensure the specified number of Pod “replicas” are running at any one time. If you created a Replication Controller for a Pod and specified 3 replicas, it will create 3 Pods and will continuously monitor them. If one Pod dies then the Replication Controller will replace it to maintain a total count of 3. This is illustrated in the animated image below:

If the Pod that died comes back then you have 4 Pods, consequently the Replication Controller will terminate one so the total count is 3. If you change the number of replicas to 5 on the fly, the Replication Controller will immediately start 2 new Pods so the total count is 5. You can also scale down Pods this way, a handy feature performing rolling updates.
When creating a Replication Controller you need to specify two things:
- Pod Template: the template that will be used to create the Pods replicas.
- Labels: the labels for the Pods that this Replication Controller should monitor.
So now you have created a few replicas of a Pod, how do you load balance between them? Enter Services.
Services
If Pods are ephemeral and their IP address might change if they get restarted how can I reliably reference my backend container from a frontend container?
Service is an abstraction that defines a set of Pods and a policy to access them. Services find their group of Pods using Labels. Because Services are abstraction you don’t usually see them in diagrams which makes the concept hard to understand.
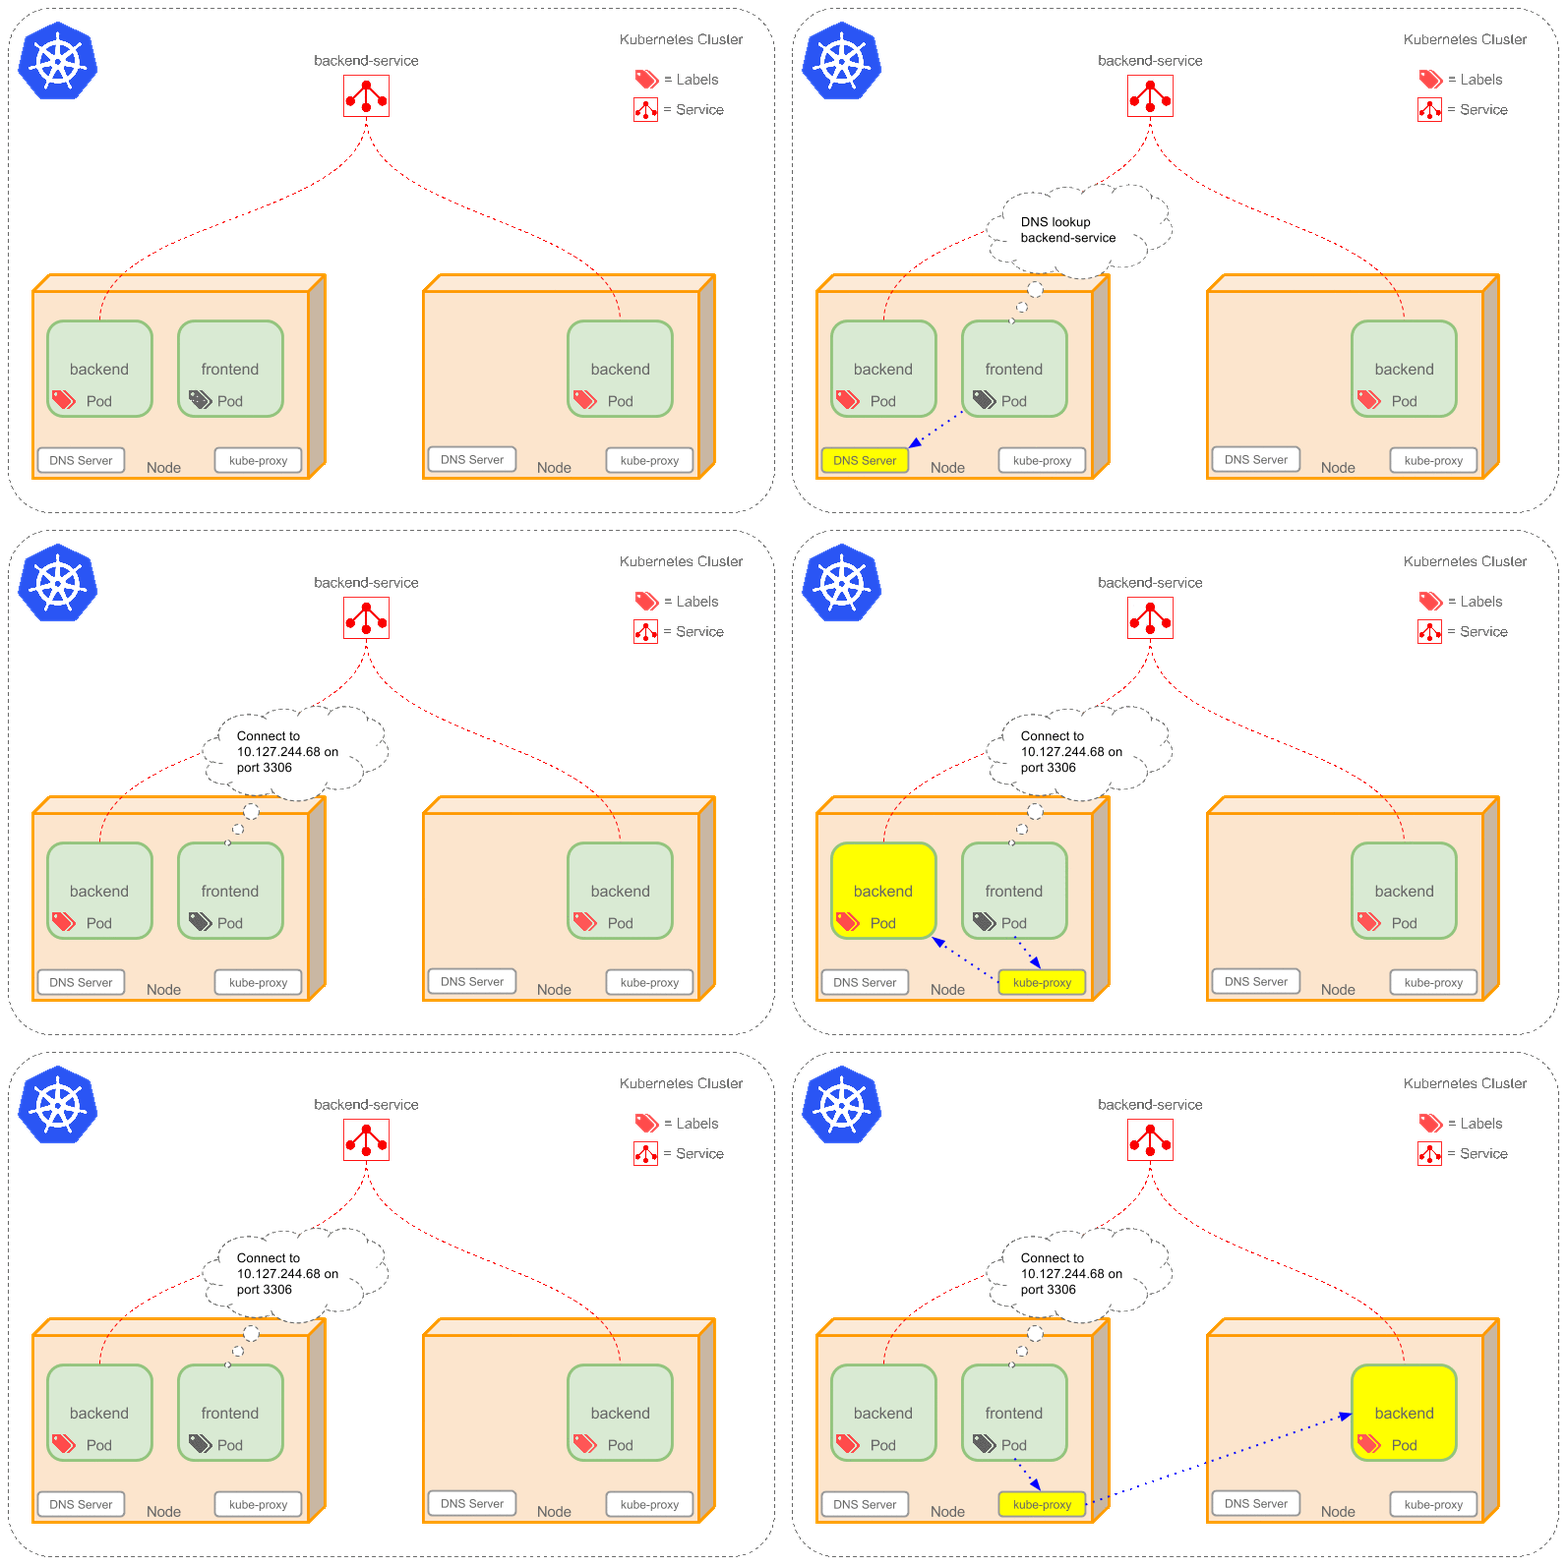
Now, imagine you have 2 backend Pods and you defined a backend Service named ‘backend-service’ with label selector (tier=backend, app=myapp). Service backend-service will facilitate two key things:
A cluster-local DNS entry will be created for the Service so your frontend Pod only need to do a DNS lookup for hostname ‘backend-service’ this will resolve to a stable IP address that your frontend application can use.
So now your frontend has got an IP address for the backend-service, but which one of the 2 backend Pods will it access? The Service will provide transparent load balancing between the 2 backend Pods and forward the request to any one of them (see the animated diagram below). This is done by using a proxy (kube-proxy) that runs on each Node. More technical details here.
This animated diagram illustrates the function of Services. Note that this diagram is overly simplified. The underlying networking and routing involved to achieve this transparent load balancing is relatively advanced if you are not into network configurations. Have a peek here if you are interested in a deep dive.

There is a special type of Kubernetes Services called ‘LoadBalancer’, which is used as an external load balancer to balance traffic between a number of Pods. Handy for load balancing Web traffic for example.
Nodes
A node (the orange box) is a physical or virtual machine that acts as a Kubernetes worker, used to be called Minion. Each node runs the following key Kubernetes components:
- Kubelet: is the primary node agent.
- kube-proxy: used by Services to proxy connections to Pods as explained above.
- Docker or Rocket. The container technology that Kubernetes uses to create containers.
Kubernetes Master
The cluster has a Kubernetes Master (the box in purple). The Kubernetes Master provides a unified view into the cluster and has a number of components such the Kubernetes API Server. The API Server provides a REST endpoint that can be used to interact with the cluster. The master also includes the Replication Controllers used to create and replicate Pods.
Where to next
Now armed with the basic knowledge of the key concepts of Kubernetes you can have a look at my recent follow on post “Getting Started with Kubernetes on Google Container Engine“. You can also have a look at the Kubernetes user guide. The user guide provides a quick walkthrough and a thorough walkthrough.
If you can’t wait and want to get your hands on some Kubernetes practice then head over to Google Container Engine. Google Container Engine is a hosted Kubernetes container environment. Simply signup/signin and run through the Walkthroughs examples.